Using OpenAI GPT models is possible only through OpenAI API. In other words, you must share your data with OpenAI to use their GPT models.
Data confidentiality is at the center of many businesses and a priority for most individuals. Sending or receiving highly private data on the Internet to a private corporation is often not an option.
For these reasons, you may be interested in running your own GPT models to process locally your personal or business data.
Fortunately, there are many open-source alternatives to OpenAI GPT models. They are not as good as GPT-4, yet, but can compete with GPT-3.
For instance, EleutherAI proposes several GPT models: GPT-J, GPT-Neo, and GPT-NeoX. They are all fully documented, open, and under a license permitting commercial use.
These models are also big. The smallest, GPT-J, takes almost 10 Gb of disk space when compressed (6 billion parameters). On some machines, loading such models can take a lot of time. Ideally, we would need a local server that would keep the model fully loaded in the background and ready to be used.
One way to do that is to run GPT on a local server using a dedicated framework such as nVidia Triton (BSD-3 Clause license). Note: By “server” I don’t mean a physical machine. Triton is just a framework that can you install on any machine.
Triton with a FasterTransformer (Apache 2.0 license) backend manages CPU and GPU loads during all the steps of prompt processing. Once Triton hosts your GPT model, each one of your prompts will be preprocessed and post-processed by FastTransformer in an optimal way based on your hardware configuration.
In this article, I will show you how to serve a GPT-J model for your applications using Triton Inference Server. I chose GPT-J because it is one of the smallest GPT models which is both performant and exploitable for commercial use (Apache 2.0 license).
Requirements
Hardware
You need at least one GPU supporting CUDA 11 or higher. We will run a large model, GPT-J, so your GPU should have at least 12 GB of VRAM.
Setting up the Triton server and processing the model take also a significant amount of hard drive space. You should have at least 50 GB available.
OS
You need a UNIX OS, preferably Ubuntu or Debian. If you have another UNIX OS, it will work as well but you will have to adapt all the commands that download and install packages to the package manager of your OS.
I ran all the commands presented in this tutorial on Ubuntu 20.04 under WSL2. Note: I ran into some issues with WSL2 that I will explain but that you may not have if you are running a native Ubuntu.
For some of the commands, you will need “sudo” privileges.
Dependencies
FasterTransformer requires CMAKE for compilation.
There are other dependencies but I’ll provide a guide to install them, inside this tutorial, when necessary.
Setting up a docker container for Triton
We will use a docker image already prepared by nVidia. It is provided in a specific branch of the “fastertransformer_backend”.
So first we have to clone this repository and get this branch.
git clone https://github.com/triton-inference-server/fastertransformer_backend.git
cd fastertransformer_backend && git checkout -b t5_gptj_blog remotes/origin/dev/t5_gptj_blog
If you don’t have Docker, jump to the end of this article where you will find a short tutorial to install it.
The following command builds the docker for the Triton server.
docker build --rm  --build-arg TRITON_VERSION=22.03 -t triton_with_ft:22.03 -f docker/Dockerfile .
cd ../
It should run smoothly. Note: In my case, I had several problems with GPG keys that were missing or not properly installed. If you have a similar issue, drop a message in the comments. I’ll be happy to help you!
Then, we can run the docker image:
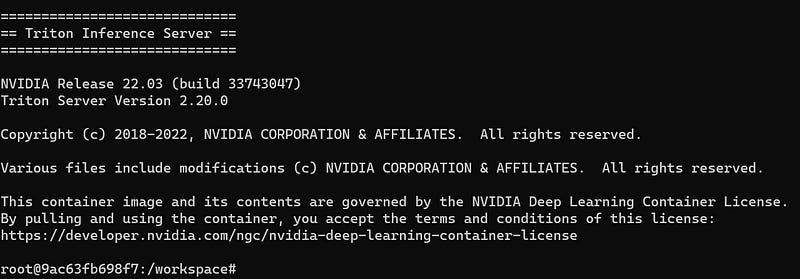
docker run -it --rm --gpus=all --shm-size=4G -v $(pwd):/ft_workspace -p 8888:8888 triton_with_ft:22.03 bashIf it succeeds, you will see something like this:
Note: If you see the error “docker: Error response from daemon: could not select device driver “” with capabilities: [[gpu]].”, it may mean that you don’t have the nVidia container installed. I provide installation instructions at the end of the article.
Don’t leave or close this container: All the remaining steps must be performed inside it.
Prepare GPT-J for FasterTransformer
The next steps prepare the GPT-J model.
We need to get and configure FasterTransformer. Note: You will need CMAKE for this step.
git clone https://github.com/NVIDIA/FasterTransformer.git

mkdir -p FasterTransformer/build && cd FasterTransformer/build
git submodule init && git submodule update
cmake -DSM=xx -DCMAKE_BUILD_TYPE=Release -DBUILD_PYT=ON -DBUILD_MULTI_GPU=ON ..
#I put -j8 below because my CPU has 8 cores.
#Since this compilation can take some time, I recommend that you change this number to the number of cores your CPU has.
make -j8
It may take enough time to drink a coffee ☕.
FasterTransformer is used to run the model inside the Triton server. It can manage preprocessing and post-processing of input/output.
Now, we can get GPT-J:
cd ../../
mkdir models
wget https://the-eye.eu/public/AI/GPT-J-6B/step_383500_slim.tar.zstd
tar -axf step_383500_slim.tar.zstd -C ./models/
This command first downloads the model and then extracts it.
It may take enough time to drink two coffees ☕☕or to take a nap if you don’t have high-speed Internet. There is around 10 GB to download.
The next step is the conversion of the model weights to FasterTransformer format.
cd models
pip install nvidia-cuda-nvcc
python3 ../FasterTransformer/examples/pytorch/gptj/utils/gptj_ckpt_convert.py --output-dir ./gptj6b_ckpt/ --ckpt-dir ./step_383500/ --n-inference-gpus 1
I put “1” for “ — n-inference-gpus” because I have only 1 GPU but if you have more you can put a higher number. Note: I added “nvidia-cuda-nvcc” because it was needed in my environment. It may already be installed in yours. If you have other issues with another library called “ptxas” drop a comment I’ll answer it.
If you are running into an error with the previous command about “jax” or “jaxlib”, the following command solved it for me:
pip install --upgrade "jax[cuda11_local]" -f https://storage.googleapis.com/jax-releases/jax_cuda_releases.htmlOptimization
Before starting the server, it is also recommended to run the kernel auto-tuning. It will find among all the low-level algorithms the best one given the architecture of GPT-J and your machine hardware. gpt_gemm will do that:
./FasterTransformer/build/bin/gpt_gemm 8 1 32 12 128 6144 51200 1 2It should produce a file named “gemm_config.in”.
Configuration of FasterTransformer
Now, we want to configure the server to run GPT-J. Find and open the following file:
fastertransformer_backend/all_models/gptj/fastertransformer/config.pbtxt
Set up the parameter for your number of GPUs. Note: It must be the same as you have indicated with “n-inference-gpus” when converting the weights of GPT-J.
parameters {
  key: "tensor_para_size"
  value: {
    string_value: "1"
  }
}
Then, indicate where to find GPT-J:
parameters {
  key: "model_checkpoint_path"
  value: {
    string_value: "./models/gptj6b_ckpt/1-gpu/"
  }
}
Run the Triton server
To launch the Triton server, run the following command: Note: Change “CUDA_VISIBLE_DEVICES” to set the IDs of your GPUs, e.g., “0,1” if you have two GPUs that you would like to use.
CUDA_VISIBLE_DEVICES=0 /opt/tritonserver/bin/tritonserver --model-repository=./triton-model-store/mygptj/ &If everything works correctly, you will see in your terminal the server waiting with 1 model loaded by FasterTransformer.
It remains to create a client that queries the server. It can be for instance your application that will exploit the GPT-J model.
nVidia provides an example of a client in:
fastertransformer_backend/tools/end_to_end_test.py
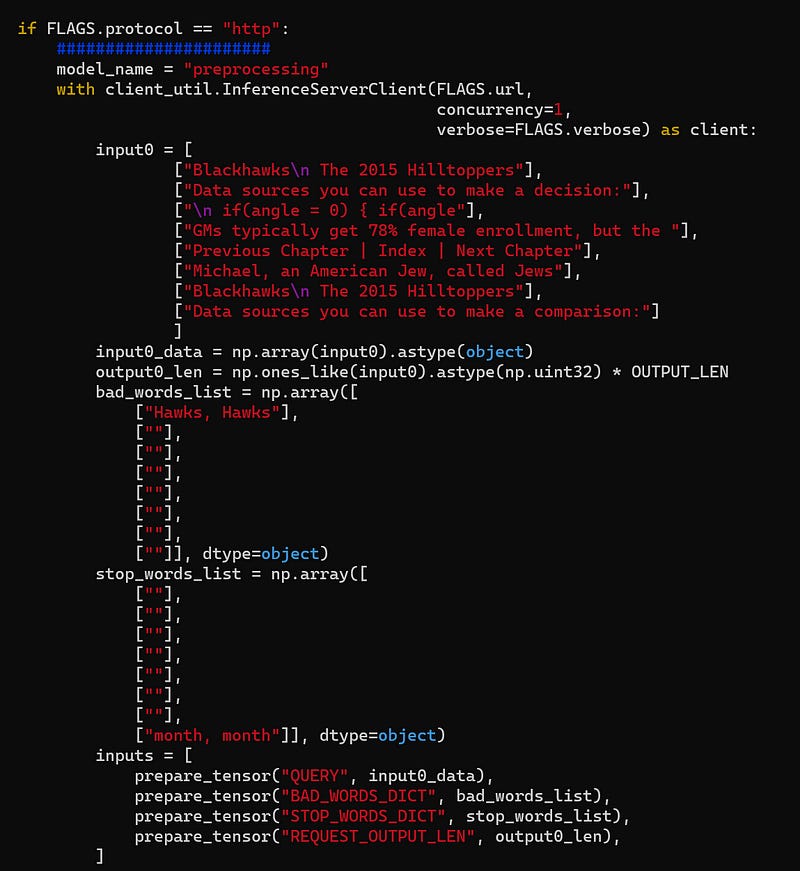
This script may look quite complicated but it only prepares all the arguments and batch your prompts, and then send everything to the server which is in charge of everything else.
Modify the variable input0 to include your prompts. It is located here:
Finally, you can run this script to prompt your Triton server. You should get the response quickly since the model is already fully loaded and optimized.
And that’s it! You have now everything you need to start exploiting your local GPT model in your applications.
Conclusion
The steps explained in this article are also applicable to all other models supported by FasterTransformer (except for specific parts that you will have to adapt). You can find the list here. If the model you want to use is not in the list, it may work as well or you may have to modify some of the commands I provide.
If you have many GPUs at your disposal, you can straightforwardly apply the same steps to GPT-Neo* models. You would only have to modify the “config.pbtxt” to adapt to these models. Note: nVidia may have already prepared these configuration files, so look in the FasterTransformer repository before making your own configuration files.
If you want to use T5 instead of a GPT model, you can have a look at this tutorial written by nVidia. Note: nVidia’s tutorial is outdated, you will have to modify some commands.
Successfully installing and running a Triton inference server by just following these steps is very much dependent on your machine configuration. If you have any issues, feel free to drop a comment and I’ll try to help.
Further instructions to install missing dependencies
Installation of Docker (Ubuntu):
sudo apt-get update
sudo apt-get install ca-certificates curl gnupg

#Add the official GPG key
sudo mkdir -m 0755 -p /etc/apt/keyrings
curl -fsSL https://download.docker.com/linux/ubuntu/gpg | sudo gpg --dearmor -o /etc/apt/keyrings/docker.gpg

#Set up the repository
echo "deb [arch="$(dpkg --print-architecture)" signed-by=/etc/apt/keyrings/docker.gpg] https://download.docker.com/linux/ubuntu  "$(. /etc/os-release && echo "$VERSION_CODENAME")" stable" |  sudo tee /etc/apt/sources.list.d/docker.list > /dev/null

#Update again
sudo apt-get update

#Then we can finally install docker
sudo apt-get install docker-ce docker-ce-cli containerd.io docker-buildx-plugin docker-compose-plugin

#Optional: If you run Ubuntu under WSL2, you may need to start Docker manually
sudo service docker start

#If everything is properly installed, this should work
sudo docker run hello-world
Installation of nvidia-container-toolkit (Ubuntu):
#Add the repository
distribution=$(. /etc/os-release;echo $ID$VERSION_ID) \
      && curl -fsSL https://nvidia.github.io/libnvidia-container/gpgkey | sudo gpg --dearmor -o /usr/share/keyrings/nvidia-container-toolkit-keyring.gpg \
      && curl -s -L https://nvidia.github.io/libnvidia-container/$distribution/libnvidia-container.list | \
            sed 's#deb https://#deb [signed-by=/usr/share/keyrings/nvidia-container-toolkit-keyring.gpg] https://#g' | \
            sudo tee /etc/apt/sources.list.d/nvidia-container-toolkit.list

#Get and install the nvidia container toolkit
sudo apt-get update
sudo apt-get install -y nvidia-container-toolkit

#Restart docker
sudo systemctl restart docker

#or run "sudo service docker start" if you use WSL2


